> ## Documentation Index
> Fetch the complete documentation index at: https://docs.bringyourai.com/llms.txt
> Use this file to discover all available pages before exploring further.
# Web Extension
#### Login
Once you have [installed the web extension](/pages/installation#1-the-web-extension), click its icon in your browser's toolbar to open the popup and log in. Make sure to use the same account associated with your subscription. If you don't have a subscription yet, you can get one [here](https://whop.com/checkout/plan_so7fGMvb3plYL).
#### Launch and Set Up the VSCode Extension
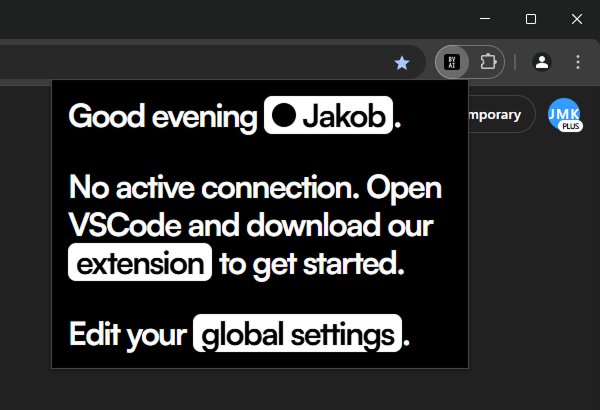 If the [VSCode extension](/pages/vscode-extension) is not running or hasn't been set up, you'll see the `No active connection...` message in the popup. Ensure VSCode is running and the extension is configured before proceeding.
#### Enable BringYourAI on a Website
Visit your desired AI chat website and open the extension popup again.
If the [VSCode extension](/pages/vscode-extension) is not running or hasn't been set up, you'll see the `No active connection...` message in the popup. Ensure VSCode is running and the extension is configured before proceeding.
#### Enable BringYourAI on a Website
Visit your desired AI chat website and open the extension popup again.
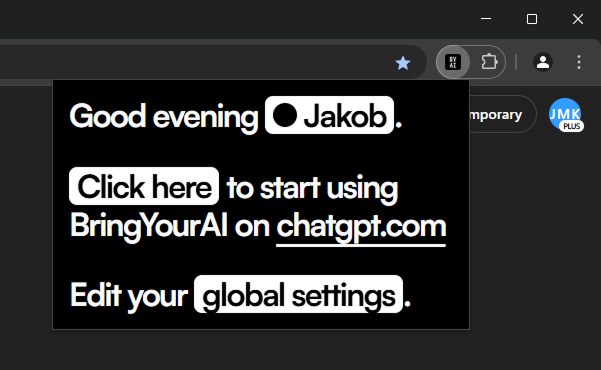 To use BringYourAI on a new website, you first need to grant permission for the extension to access that site. Click `Click here` in the popup's center and approve the requested permissions in your browser.
To turn off BringYourAI for the website you're currently visiting, right-click the BringYourAI
icon in your browser's toolbar. Then, click the `Enable BringYourAI on this domain` option in
the menu. This will remove the checkmark ✓ and disable the extension *only* on this specific
site.
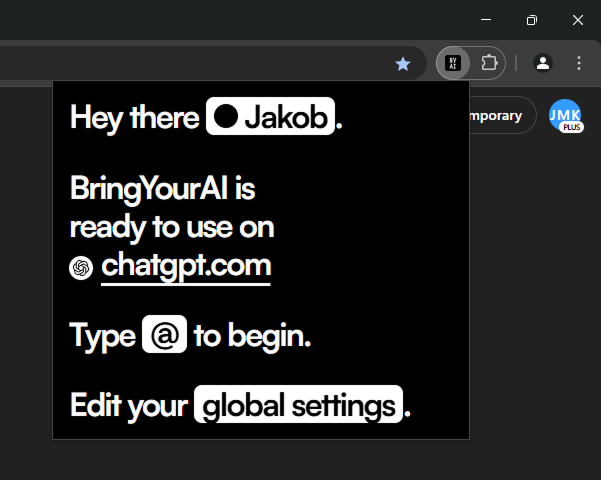
Once permissions are granted, the popup should display the `BringYourAI is ready to use...` message, indicating a successful setup for that site.
To use BringYourAI on a new website, you first need to grant permission for the extension to access that site. Click `Click here` in the popup's center and approve the requested permissions in your browser.
To turn off BringYourAI for the website you're currently visiting, right-click the BringYourAI
icon in your browser's toolbar. Then, click the `Enable BringYourAI on this domain` option in
the menu. This will remove the checkmark ✓ and disable the extension *only* on this specific
site.
Once permissions are granted, the popup should display the `BringYourAI is ready to use...` message, indicating a successful setup for that site.
 Now let's explore the UI elements.
#### Logout
Clicking your name at the top of the popup opens a dialog with a logout button.
#### Custom Trigger Char
Click the trigger char displayed in the `Type [...] to begin.` message within the popup. This opens a dialog allowing you to customize the trigger char specifically for the current website.
The **trigger char** is what you type in an input field on the AI chat website to activate the BringYourAI popover.
You can either use the default global trigger char or set a site-specific one. This is helpful on websites where the default char might conflict with existing site functionality (e.g., '@' on ChatGPT often triggers GPT mentions, so '#' is the default there).
#### Global Settings
Clicking `global settings` at the bottom of the popup opens the global settings dialog.
Now let's explore the UI elements.
#### Logout
Clicking your name at the top of the popup opens a dialog with a logout button.
#### Custom Trigger Char
Click the trigger char displayed in the `Type [...] to begin.` message within the popup. This opens a dialog allowing you to customize the trigger char specifically for the current website.
The **trigger char** is what you type in an input field on the AI chat website to activate the BringYourAI popover.
You can either use the default global trigger char or set a site-specific one. This is helpful on websites where the default char might conflict with existing site functionality (e.g., '@' on ChatGPT often triggers GPT mentions, so '#' is the default there).
#### Global Settings
Clicking `global settings` at the bottom of the popup opens the global settings dialog.
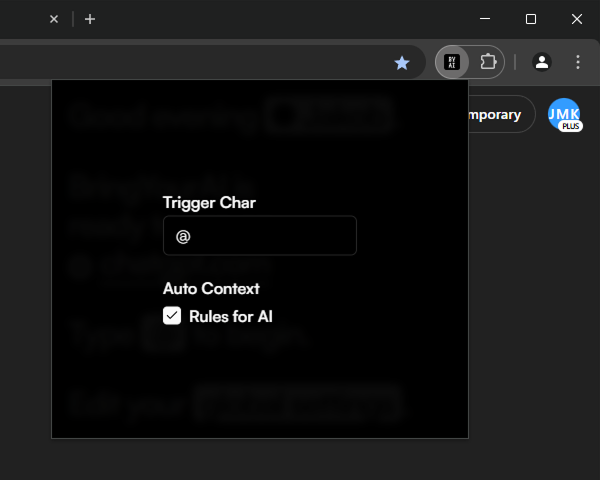 Here, you can change the global trigger char used by default on all websites unless a site-specific trigger is set.
#### Auto Context
Enable 'Auto Context' for `Rules for AI` to automatically include rules defined in the VSCode extension in the *first* message of a new chat conversation. These rules will not be added to subsequent messages within the same conversation, ensuring they are applied once per chat session.
#### The Popover
Let's examine the popover that appears when you type the trigger char in an input field.
Here, you can change the global trigger char used by default on all websites unless a site-specific trigger is set.
#### Auto Context
Enable 'Auto Context' for `Rules for AI` to automatically include rules defined in the VSCode extension in the *first* message of a new chat conversation. These rules will not be added to subsequent messages within the same conversation, ensuring they are applied once per chat session.
#### The Popover
Let's examine the popover that appears when you type the trigger char in an input field.
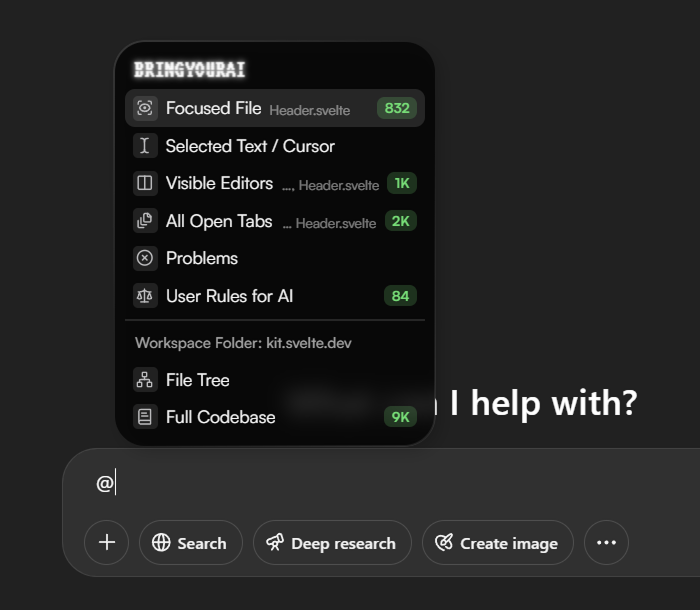 Each option adds specific context to the input field:
| Name | Description |
| ----------------------------- | --------------------------------------------------------------------------------------------------------------------------------------------------------------------------------------------------------------------------------------------------- |
| Focused File | Adds the entire content of the file currently active (focused) in VSCode. |
| Selected Text / Cursor | Adds the text currently selected in VSCode. If no text is selected, it adds the code immediately surrounding your cursor, including a clear indicator for your exact cursor position. A unique ID number distinguishes multiple selections/cursors. |
| Visible Editors | Adds the content of all files currently visible in VSCode editors (e.g., files in split view). Does not include files open in tabs but not currently visible. |
| All Open Tabs | Adds the content of all files currently open in VSCode tabs, including those not actively visible. |
| Problems | Adds all problems detected by VSCode (from the Problems Panel), including surrounding code context for each issue. |
| User Rules for AI | Adds your custom `Rules for AI` defined at the `User` (global) level in VSCode settings. |
| Workspace Rules for AI | Adds your custom `Rules for AI` defined at the `Workspace` level in VSCode settings. |
| Workspace Folder Rules for AI | Adds your custom `Rules for AI` defined at the `Folder` level in VSCode settings. |
| File Tree | Adds a textual representation showing the structure of non-ignored files and folders within the relevant workspace folder. |
| Full Codebase | Adds the content of all non-ignored files within the relevant workspace folder. |
| Browser Tabs | Adds the main text content of the selected browser tab, or you can click the small camera icon to attach a screenshot of that tab. |
| Search GitHub Repositories | Search for and attach entire GitHub repositories, including private ones when you’re signed in to the GitHub account that has access to them in that browser. You can also select any branch you need. |
| Context7 Library Docs | Search for and attach [Context7](https://context7.com) library docs. More info [here](/pages/web-extension#context7-library-docs)! |
You can search for specific files, folders, or the options above by typing your query after the trigger character.
Each option adds specific context to the input field:
| Name | Description |
| ----------------------------- | --------------------------------------------------------------------------------------------------------------------------------------------------------------------------------------------------------------------------------------------------- |
| Focused File | Adds the entire content of the file currently active (focused) in VSCode. |
| Selected Text / Cursor | Adds the text currently selected in VSCode. If no text is selected, it adds the code immediately surrounding your cursor, including a clear indicator for your exact cursor position. A unique ID number distinguishes multiple selections/cursors. |
| Visible Editors | Adds the content of all files currently visible in VSCode editors (e.g., files in split view). Does not include files open in tabs but not currently visible. |
| All Open Tabs | Adds the content of all files currently open in VSCode tabs, including those not actively visible. |
| Problems | Adds all problems detected by VSCode (from the Problems Panel), including surrounding code context for each issue. |
| User Rules for AI | Adds your custom `Rules for AI` defined at the `User` (global) level in VSCode settings. |
| Workspace Rules for AI | Adds your custom `Rules for AI` defined at the `Workspace` level in VSCode settings. |
| Workspace Folder Rules for AI | Adds your custom `Rules for AI` defined at the `Folder` level in VSCode settings. |
| File Tree | Adds a textual representation showing the structure of non-ignored files and folders within the relevant workspace folder. |
| Full Codebase | Adds the content of all non-ignored files within the relevant workspace folder. |
| Browser Tabs | Adds the main text content of the selected browser tab, or you can click the small camera icon to attach a screenshot of that tab. |
| Search GitHub Repositories | Search for and attach entire GitHub repositories, including private ones when you’re signed in to the GitHub account that has access to them in that browser. You can also select any branch you need. |
| Context7 Library Docs | Search for and attach [Context7](https://context7.com) library docs. More info [here](/pages/web-extension#context7-library-docs)! |
You can search for specific files, folders, or the options above by typing your query after the trigger character.
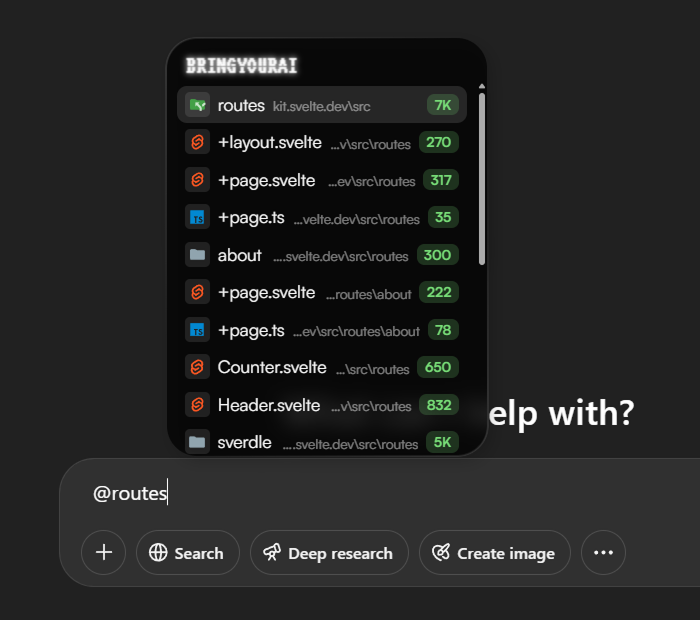 Use the Up/Down arrow keys to navigate the options and press Enter to select one. You can also click an option with your mouse.
When you add a file to the chat and then edit it in VSCode, BringYourAI will automatically
update the file content in your chat message to reflect the latest version.
#### Tokens
Most options display an estimated **token count**. This number represents the approximate number of tokens the selected context will add to your message. AI language models have maximum token limits per message (context window size); content exceeding this limit will be ignored by the AI. Token limits vary by model (check the specific model's documentation). Monitoring these counts helps you stay within the model's context window.
Token counts for individual files/folders might not appear immediately in the popover for very
large workspaces, as the initial calculation can be time-consuming. However, the token count
*will* be displayed in the context chip once an item is added to the input field.
#### Context Chips
Context added via BringYourAI appears as chips above the input field.
Use the Up/Down arrow keys to navigate the options and press Enter to select one. You can also click an option with your mouse.
When you add a file to the chat and then edit it in VSCode, BringYourAI will automatically
update the file content in your chat message to reflect the latest version.
#### Tokens
Most options display an estimated **token count**. This number represents the approximate number of tokens the selected context will add to your message. AI language models have maximum token limits per message (context window size); content exceeding this limit will be ignored by the AI. Token limits vary by model (check the specific model's documentation). Monitoring these counts helps you stay within the model's context window.
Token counts for individual files/folders might not appear immediately in the popover for very
large workspaces, as the initial calculation can be time-consuming. However, the token count
*will* be displayed in the context chip once an item is added to the input field.
#### Context Chips
Context added via BringYourAI appears as chips above the input field.
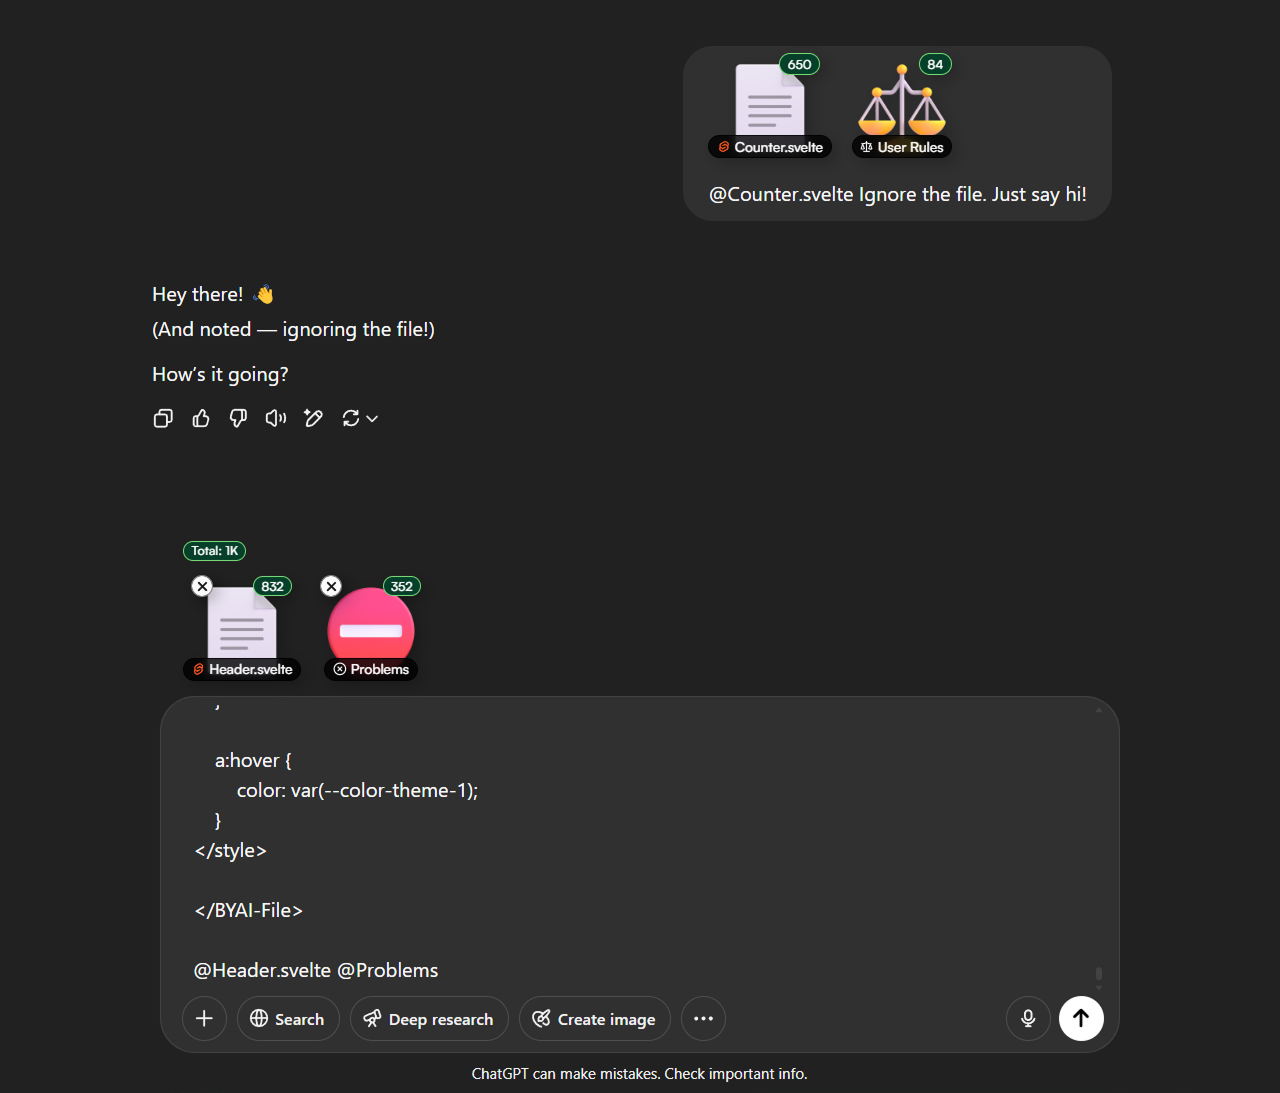 * Click the `x` on a chip to remove that specific context from your message.
* Clicking the chip itself allows you to preview its content.
* The total token count for all added context chips is displayed above the chips.
* Hovering over the chips reveals a `Hide` toggle, which lets you hide them in case they obstruct anything behind.
Context added via BringYourAI also gets shrunk down into context chips within your chat history messages to avoid clutter.
#### Multiple VSCode Instances or Workspace Folders
BringYourAI seamlessly handles multiple VSCode windows and multiple workspace folders within a window. No extra configuration is needed. The popover UI will group context options by VSCode instance and/or workspace folder, and search spans across all connected instances and folders.
#### Context7 Library Docs
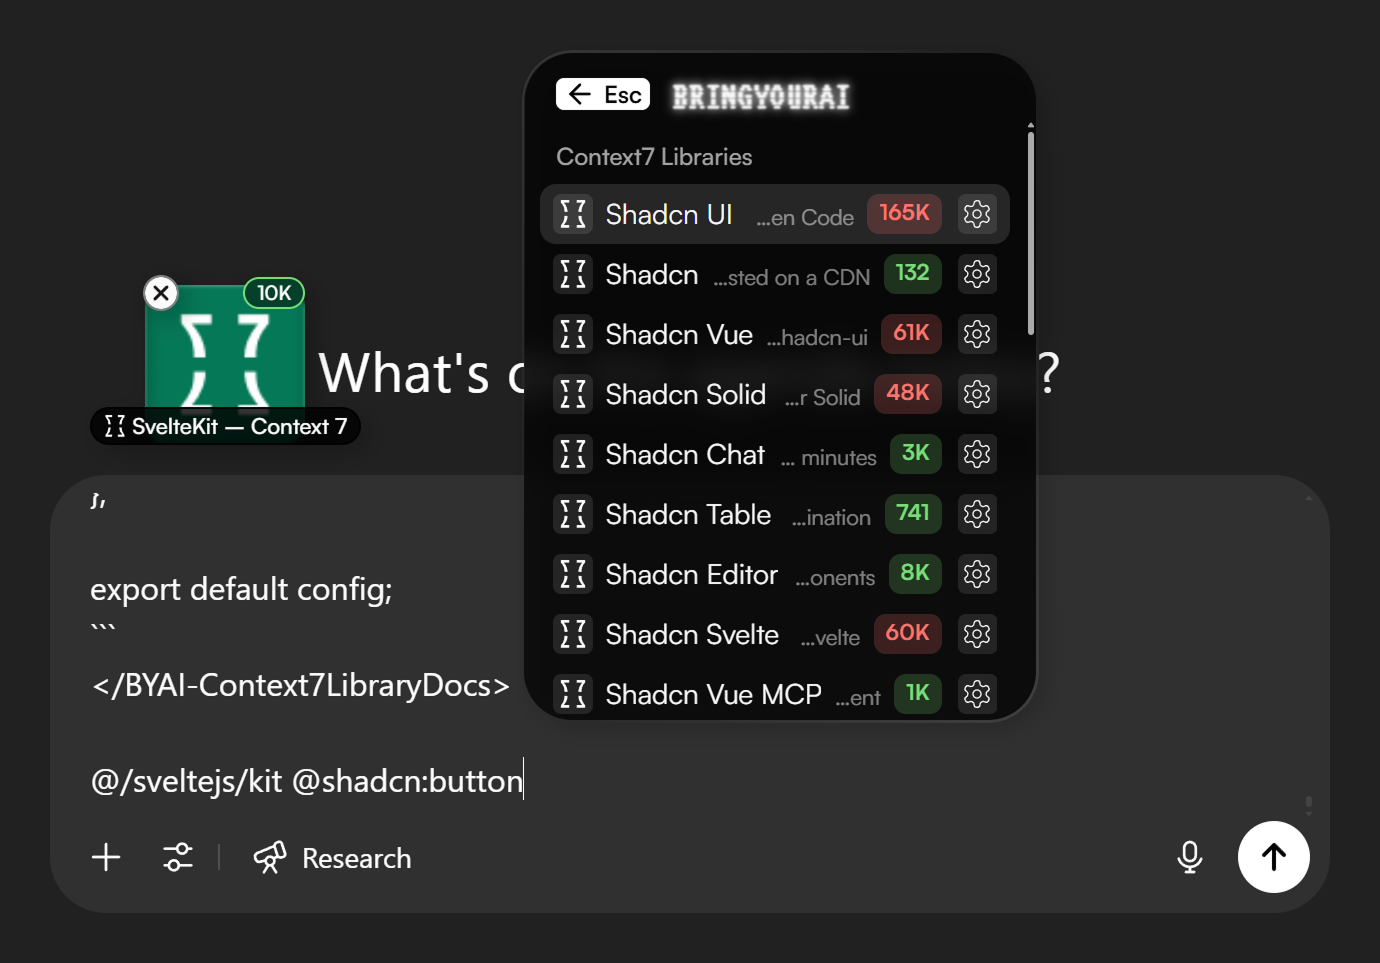
[Context7](https://context7.com) is a large collection of LLM-optimized library documentation that also allows you to semantically search for specific topics, so you don’t have to include everything or worry about token limits.
These extra settings are accessible via the small button on the right of each Context7 search result. To go even faster, you can append settings directly to your search query using colons, while having your desired docs option focused and pressing Enter. For example:
`@sveltekit:routing:20000`
In this format, the string after the first colon is the topic, and the number after the second colon is the token limit. By default, the token limit is 10,000.
To quickly attach the full documentation, just add `:full` to your query, like this:
`@sveltekit:full`
* Click the `x` on a chip to remove that specific context from your message.
* Clicking the chip itself allows you to preview its content.
* The total token count for all added context chips is displayed above the chips.
* Hovering over the chips reveals a `Hide` toggle, which lets you hide them in case they obstruct anything behind.
Context added via BringYourAI also gets shrunk down into context chips within your chat history messages to avoid clutter.
#### Multiple VSCode Instances or Workspace Folders
BringYourAI seamlessly handles multiple VSCode windows and multiple workspace folders within a window. No extra configuration is needed. The popover UI will group context options by VSCode instance and/or workspace folder, and search spans across all connected instances and folders.
#### Context7 Library Docs
[Context7](https://context7.com) is a large collection of LLM-optimized library documentation that also allows you to semantically search for specific topics, so you don’t have to include everything or worry about token limits.
These extra settings are accessible via the small button on the right of each Context7 search result. To go even faster, you can append settings directly to your search query using colons, while having your desired docs option focused and pressing Enter. For example:
`@sveltekit:routing:20000`
In this format, the string after the first colon is the topic, and the number after the second colon is the token limit. By default, the token limit is 10,000.
To quickly attach the full documentation, just add `:full` to your query, like this:
`@sveltekit:full`